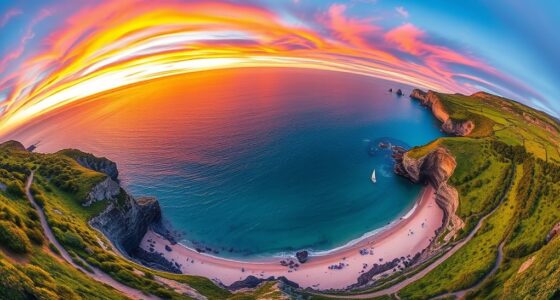
To shoot great panoramic photos with a drone, start by preparing your equipment—charge batteries, check propellers, and calibrate your drone. Choose a clear, open location with good lighting and no restrictions, ideally during golden hour. Plan your flight path and camera angles for smooth coverage, ensuring enough overlap between shots. Use automatic settings and stabilization for consistent images. Finally, process and stitch your photos for stunning wide-angle results, and if you continue, you’ll learn detailed tips for perfect panoramas.
Key Takeaways
- Fully charge your drone batteries, inspect propellers, and calibrate sensors for stable, high-quality images.
- Choose a scenic, open location with good lighting and minimal obstacles, preferably during golden hour.
- Plan your flight path with sufficient overlap (20-30%) and set camera angles for seamless stitching.
- Use automatic camera settings and stabilization features to maintain consistent exposure and sharpness.
- Capture all images with steady positioning, then process and stitch them using dedicated software for the final panorama.

2 Set FPV Drone Lock Mount for Backpack Plug-in Accessories DIY Bundle Mount Hanging Buckle with Battery Straps for FPV Quadcopter
FPV drone backpack plug-in accessories bundle mount hanging buckle
As an affiliate, we earn on qualifying purchases.
As an affiliate, we earn on qualifying purchases.
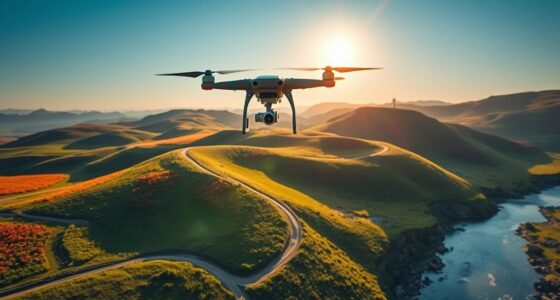
Prepare Your Drone and Equipment

Before you start shooting panoramic photos with your drone, it’s vital to prepare your equipment properly. First, verify your drone’s battery is fully charged to avoid interruptions during your shoot. A fresh, well-charged drone battery provides the power needed for smooth, uninterrupted flights. Next, check the propellers for safety; inspect for any damage or cracks, and securely tighten them to prevent wobbling or accidents. Propeller safety is crucial, as damaged or loose blades can cause crashes or blurry photos. Additionally, consider bringing spare batteries and extra propellers to stay prepared. Properly maintaining and prepping your drone ensures a smoother shooting experience while protecting your equipment and capturing high-quality panoramic images. Ensuring your drone’s power management is optimized can significantly improve your overall shooting experience and image quality. Also, familiarize yourself with the drone’s flight controls to ensure precise movements during your panoramic capture. Being aware of your drone’s energy efficiency can help extend flight times and improve the quality of your shots.

Camera Stabilizer, High Technology Drone Camera Gimbal Metal Brushless Gimbal Board BGC 2.2 for 3/3+ / 4 Camera RC Drone Quadcopter Part (Black) Gimbal Drone
[Ready-to-fly 12v Rtf Version] This complete rtf (ready-to-fly) gimbal comes fully assembled with all necessary components including screws…
As an affiliate, we earn on qualifying purchases.
As an affiliate, we earn on qualifying purchases.
Choose the Ideal Shooting Location and Time

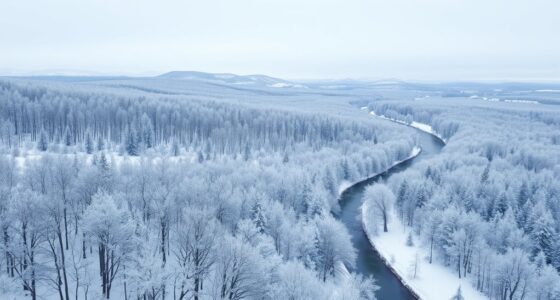
Selecting the right location and time is crucial for capturing stunning panoramic drone photos. Consider weather considerations like clear skies, low wind, and good lighting conditions to guarantee sharp, vibrant images. Overcast days can work too, but avoid heavy rain or fog that can obscure details. Additionally, check for legal restrictions in your area, such as no-fly zones, private property limits, or altitude restrictions. Planning ahead helps you avoid fines or having to abort your shoot. Look for scenic, open locations with interesting features like landscapes, cityscapes, or natural landmarks. The ideal time often falls during golden hour—shortly after sunrise or before sunset—when lighting is soft and warm. This combination of location, weather, and timing ensures the best panoramic results. Proper planning and preparation can significantly improve your chances of capturing high-quality images. To optimize your shoot, consider researching specialized drone gear that can enhance your panoramic capabilities. Using electric bikes to reach remote or challenging locations can also be beneficial, especially for covering large areas efficiently. Being aware of local regulations helps you stay compliant and avoid potential issues during your drone photography adventures.

Bingchat Drone Accessory, Battery and Propellers Kits Accessories with Charging Cable AE Serials Professional Drone
Bingchat Drone Accessory, Battery and Propellers Kits Accessories with Charging Cable for Bingchat AE Serials Professional Drone
As an affiliate, we earn on qualifying purchases.
As an affiliate, we earn on qualifying purchases.
Set Up Your Drone for Panoramic Photography

Before you start capturing panoramic shots, you need to set up your drone properly. Make sure to calibrate it to guarantee smooth operation and accurate positioning. Then, select the right settings and choose a stable location to get the best results. Additionally, consider the wiring basics of your drone to ensure all components are correctly connected and functioning properly. Understanding the drone’s hardware setup can help prevent technical issues during your shoot.
Calibrate Your Drone
Calibrating your drone is a crucial first step to guarantee sharp, seamless panoramic photos. Proper drone calibration ensures that your drone’s sensors and compass are accurate, which is essential for precise camera alignment during shots. Start by performing a compass calibration in a clear area free of magnetic interference. This helps your drone register true directional data. Next, check the drone’s IMU (Inertial Measurement Unit) calibration to keep flight stability consistent. Accurate calibration minimizes camera misalignment and helps prevent drift during panoramic captures. Remember, a well-calibrated drone provides better control and more consistent results, making your panoramic photos look professional. Additionally, regularly performing calibration procedures ensures ongoing accuracy and reliable backup power during your photography sessions.
Choose Optimal Settings
To capture stunning panoramic photos with your drone, setting the right camera and flight parameters is vital. Start by ensuring your drone’s camera stabilization is active to prevent blurry images caused by vibrations or movements. Choose a high image resolution to maximize detail, which is essential for stitching multiple shots seamlessly. Adjust camera settings like ISO, shutter speed, and aperture to suit the lighting conditions, keeping the exposure consistent across shots. Use manual focus if available to avoid focus shifts during the panorama. Also, enable any auto-exposure bracketing features if needed. Properly configuring these settings guarantees your drone captures sharp, detailed images with minimal motion blur, setting a solid foundation for creating impressive panoramic photos. Additionally, familiarizing yourself with camera setup options can help optimize your drone’s settings for panoramic photography. Furthermore, understanding adaptive settings can assist in adjusting parameters dynamically based on environmental conditions, improving overall image quality. For best results, ensure your drone’s firmware and camera software are up to date to access the latest image processing enhancements. Incorporating lighting conditions into your setup can also significantly influence the clarity and color accuracy of your panoramic images.
Select a Stable Location
Choosing a stable location is crucial for capturing high-quality panoramic photos with your drone. Start by evaluating the terrain: look for flat ground or solid surfaces with minimal obstacles. Next, consider weather conditions: avoid strong winds, rain, or extreme temperatures that could affect drone stability. Finally, scan the surroundings for potential hazards, such as loose rocks or tall vegetation, which can cause instability or interference. A good location has a clear view of the sky, steady footing, and predictable weather patterns. This ensures your drone remains steady during the shot, reducing blur and misalignment. Proper terrain assessment and weather considerations set the foundation for a successful panoramic shoot, resulting in crisp, seamless images. Additionally, understanding environmental considerations techniques can improve your ability to recognize subtle environmental cues, helping you select the most stable and safe shooting locations. Recognizing microclimates can also help you anticipate sudden weather changes that may impact drone stability, and being aware of local regulations ensures your drone operation remains safe and compliant during your shoot. Monitoring drone battery life is also essential to prevent interruptions during critical moments of your shoot.
drone photo stitching software
As an affiliate, we earn on qualifying purchases.
As an affiliate, we earn on qualifying purchases.
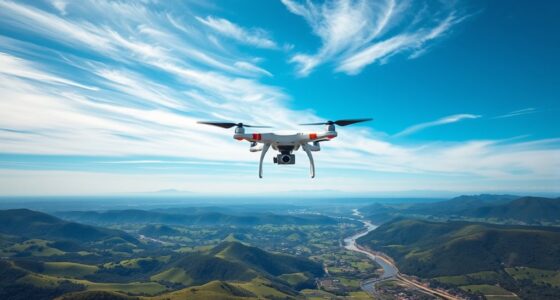
Plan Your Shooting Path and Camera Angles

Before you start capturing your panoramic shot, it’s vital to plan your drone’s flight path and camera angles carefully. You want to guarantee proper camera stabilization throughout the shot to avoid blurry images. Decide on the direction you’ll fly and the angles you’ll tilt the camera to maximize coverage. Keep in mind that sufficient image overlap, typically around 20-30%, is essential for seamless stitching later. Adjust your drone’s flight plan so it covers the entire scene smoothly, avoiding abrupt movements that could disrupt stabilization. By pre-planning your path and angles, you make sure each shot aligns well, reducing the need for extensive post-processing. This careful planning results in a series of images with consistent framing and ideal overlap, setting the stage for a perfect panoramic photo.
Capture Multiple Overlapping Images Seamlessly

To capture seamless panoramic images, you need to guarantee your shots overlap enough so they blend smoothly. Use automatic camera settings to keep exposure consistent across all images, and maintain a steady, fixed angle to avoid misalignment. Planning your overlap carefully and sticking to a consistent camera position will make stitching your photos much easier. Additionally, understanding the concept of Free Floating can help you maintain stability and avoid vibrations that could disrupt the image quality.
Plan Overlap Carefully
Ensuring your drone captures images with proper overlap is essential for creating seamless panoramic photos. Good shot planning means considering camera overlap to avoid gaps or mismatched edges. To do this, focus on these key points:
- Visualize your scene and determine the amount of overlap needed, typically 20-30%, to ensure enough shared detail between images.
- Use your drone’s camera settings and flight path to maintain consistent camera angles and spacing.
- Adjust your drone’s position to keep the overlap uniform across all shots, preventing areas from being under- or over-lapped.
- Remember that overlap accuracy plays a crucial role in achieving high-quality panoramic images and smooth stitching results.
Use Automatic Settings
Utilizing your drone’s automatic settings can greatly simplify capturing a series of overlapping images. Guarantee your drone is properly calibrated to achieve accurate camera stabilization, which reduces motion blur and ensures smooth shots. Auto mode adjusts exposure and focus, helping you maintain consistency across images. To optimize results, set your drone to take multiple shots with sufficient overlap, often around 20-30%. Here’s a quick overview:
| Tip | Explanation |
|---|---|
| Drone calibration | Ensures stability and accurate positioning |
| Camera stabilization | Keeps images sharp during movement |
| Automatic exposure | Maintains consistent brightness across shots |
Using these automatic settings allows seamless image capture, making stitching easier and the final panoramic smoother. Proper calibration and stabilization are key for professional-looking results.
Maintain Consistent Camera Angle
Maintaining a consistent camera angle is essential for seamless panoramic images, especially when capturing multiple overlapping shots. Proper camera stabilization ensures your drone’s camera remains steady, reducing blurriness and misalignment. To keep your images aligned, follow these steps:
- Use the gimbal lock feature or manual controls to lock the camera angle.
- Maintain a fixed pitch and yaw throughout the shoot.
- Keep the drone’s position steady, avoiding sudden movements.
This consistency helps with image alignment during post-processing, making stitching smoother. When your camera remains stable and pointed at the same angle, overlapping images will align perfectly, resulting in a professional-looking panoramic shot. Focus on steady camera stabilization and consistent angles to minimize editing time and maximize image quality.
Process and Stitch Your Panoramic Photos for Stunning Results

To achieve seamless panoramic photos with your drone, you’ll need to carefully process and stitch your images together. Start by selecting your best shots with a consistent panoramic composition, ensuring overlaps are sufficient for smooth stitching. Use dedicated photo editing software or stitching tools designed for drone photography. Pay attention to alignment, making sure the images match seamlessly along the horizon and other key elements. Good drone navigation during shooting reduces misalignments, but sometimes manual adjustments are necessary. Once stitched, review your panorama for any artifacts or mismatched areas, and make final edits for brightness, contrast, and sharpness. Proper processing transforms your raw images into stunning, professional-quality panoramic photos that showcase your drone’s aerial perspective.
Frequently Asked Questions
What Drone Models Are Best Suited for Panoramic Photography?
You should choose drones like the DJI Mavic Air 2 or Phantom 4 Pro for panoramic photography, as they offer excellent camera stabilization and high-quality sensors. These models deliver steady shots and sharp images, even during long shoots. Plus, their impressive battery life lets you capture extensive panoramas without interruptions. With the right drone, you’ll easily create stunning, seamless panoramic photos with minimal effort.
How Do Weather Conditions Affect Drone Panoramic Shots?
Weather conditions substantially impact your drone’s panoramic shots. Weather hazards like rain, fog, or snow can damage your drone and ruin your photos. Wind effects are especially problematic, causing instability and blurred images. To get sharp, seamless panoramas, avoid flying in strong winds or stormy weather. Wait for calm, clear days to make sure your drone remains stable, and your photos come out crisp and well-aligned.
Can I Automate the Panoramic Shooting Process?
Think of your drone as a symphony conductor—you can choose to automate or manually control the shot. Yes, you can automate the panoramic process with robotic automation features available in many drones, which guarantees smooth, consistent shots. However, manual control lets you add a personal touch and adapt on the fly. Decide based on your skill level and desired precision, but automation often simplifies capturing seamless panoramas.
What Safety Precautions Should I Take During Drone Panoramas?
You should always prioritize safety during drone panoramas by guaranteeing you have proper pilot training to handle unexpected situations. Keep a close eye on battery management, so your drone doesn’t run out of power mid-shot. Avoid flying near people, animals, or restricted areas, and check weather conditions beforehand. Additionally, perform pre-flight checks and maintain clear communication if you’re working with others to ensure a safe, smooth shooting process.
How Do I Share or Publish My Drone Panoramic Images?
Sharing your drone panoramic images is like opening a window to your world. You can upload your photos to sharing platforms like Instagram, Facebook, or specialized sites like Flickr. Before publishing, use editing techniques to enhance colors, straighten horizons, and remove any distractions. Export your images in high resolution, then upload them to your chosen platform. This way, your stunning panoramas reach others, showcasing your skills and the breathtaking landscapes you’ve captured.
Conclusion
Now that you know how to shoot stunning panoramic photos with your drone, you’re ready to capture landscapes like a modern-day explorer. Channel your inner Icarus—just remember to stay grounded and cautious as you soar. With patience and practice, your images will tell stories as mesmerizing as a voyage across uncharted skies. So, take flight, embrace the adventure, and turn your drone into a window to breathtaking horizons.